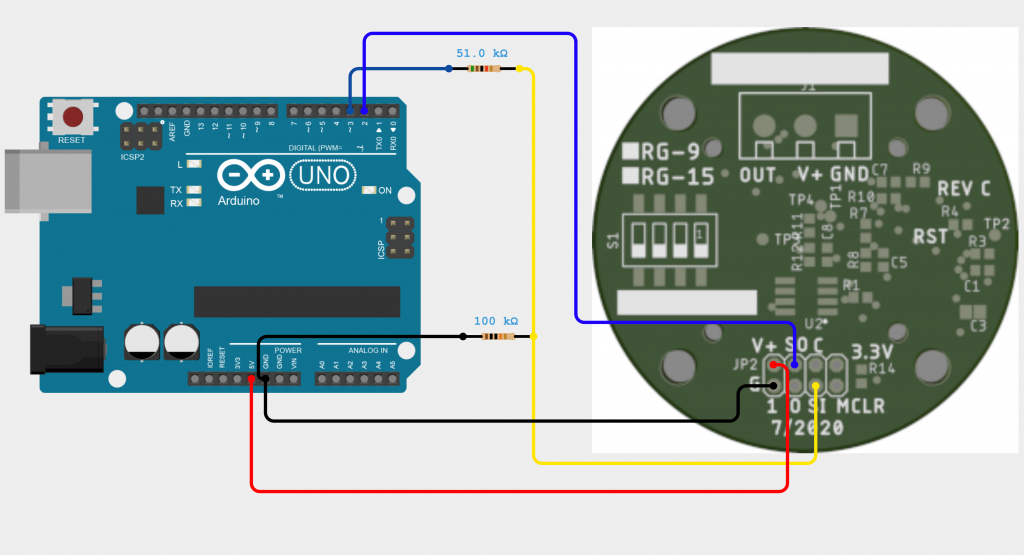
While we have an Arduino Library available this example provides a way to make your own Arduino Scratch file without using our provided one. For tutorial purposes we will be using an Arduino Uno for programming but the general principle is the same between devices.
Some helpful information for the RG device is found in this pdf: RG-15_instructions.
Principle
Much like an Arduino the RG-15 sends and receives serial data. Our goal is to send all data from the RG through the Arduino and right to our computer.
In the pdf provided explains how sending specific characters can command the device. In polling mode the RG-15 will send data back whenever it is sent an ‘r’.
The full code for this example is provided at the bottom of this page.
Diagram

Note: The Uno is a 5V part. It is supplied by by 7-12VDC (not shown) and has an internal 5V regulator. The RG-15 supply requirement is 5-35VDC and runs internally at 3.3V via its own regulator. We utilize the UNO’s 5V regulator to supply the RG-15. The input detection circuit in the UNO utilizes a converter where below 0.8V is considered 0 and above 2V is considered 1. No conversion is necessary when reading digital data from the RG-15. The UNO output is 0V – 5V and the input range of the RG-15 is 0 – 3.3V, we have elected to use a simple voltage divider to translate 5V to 3.3V. And of course with any divider, 0V remains 0v.
Code
Starting with a fresh file the first step is to set the stream between Arduino and RG.
First include the SoftwareSerial Library:
#Include <SoftwareSerial.h>With SoftwareSerial we assign two pins as our Rx and Tx Pins in this case they are set to two and three:
SoftwareSerial unoSerial = SoftwareSerial(2,3);
Finally open the stream and set the baud rate with:
unoSerial.begin(9600);
To receive data from the device we must send an ‘r’ command and then grab its response:
unoSerial.write('r');
unoSerial.write('n');
String response = unoSerial.readStringUntil('n');
Serial.println(response);
delay(1000);
Serial.println won’t work however because we need to open that Serial port so add this to setup():
Serial.begin(9600);
Full Code
#include <SoftwareSerial.h>

SoftwareSerial unoSerial = SoftwareSerial(2,3);

void setup() {
  Serial.begin(9600);
  unoSerial.begin(9600);
}

void loop() {
  unoSerial.write('r');
  unoSerial.write('n');
  String response = unoSerial.readStringUntil('n');
  Serial.println(response);
  delay(1000);
}