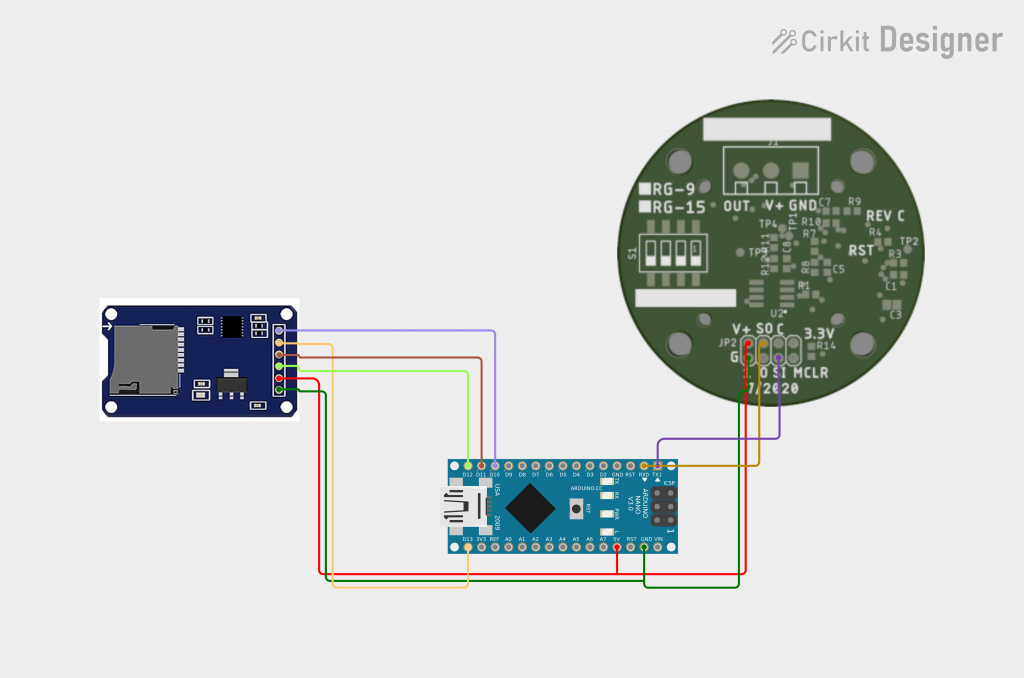
Up to this point we have successfully read and processed data from the Rain Gauge. In this example that data will be logged and stored into a CSV file. This data later can be removed from the Arduino and analyzed.
Right now that data can only be accessed by removing the microSD card from the Arduino and reading it on a computer. The next example shows how to have a local web server running on the Arduino, which then allows downloading impromptu.
Before starting this you should have completed the Continuous Guide or at least have a basic understanding of Arduinos.
Materials
- Rain Gauge
- Arduino
- MicroSD Card Reader like this one.
- Small MicroSD Card (2GB-8GB)

Code
On top of the code from our previous example there is now a third stream that needs to be opened. The SD library acts almost identical to the Serial Library and is coded the same way.
Create a chipSelect integer and assign it according to the following (If you are following the circuit above use 10):
// change this to match your SD shield or module;
// Arduino Ethernet shield: pin 4
// Adafruit SD shields and modules: pin 10
// Sparkfun SD shield: pin 8
// MKRZero SD: SDCARD_SS_PIN
const int chipSelect = 10;
On setup let’s make sure that the SD card is functioning and is connected:
if (!SD.begin(chipSelect)) {
  Serial.println("Card failed or not present");
}

Serial.println("Card Initialized.");

if (!SD.exists("log.csv")) {
    Serial.println("Creating new file.");
    File dataFile = SD.open("log.csv", FILE_WRITE);
    dataFile.println("Acc, eventAcc, totalAcc, rInt");
    dataFile.close();
}
Do you get errors when running setup? First try diagnosing the SD card using the example SD->CardInfo. Make sure your card appears in the console after running this.
The final step is to ensure that the log.csv file exists an if so, log the 4 data points from the RG. The code below replaces the serial output from the previous example:
if (SD.exists("log.csv")) {


      File dataFile = SD.open("log.csv", FILE_WRITE);

      if (dataFile) {
        dataFile.print(atof(acc), 3);
        dataFile.print(",");
        dataFile.print(atof(eventAcc), 3);
        dataFile.print(",");
        dataFile.print(atof(totalAcc), 3);
        dataFile.print(",");
        dataFile.println(atof(rInt), 3);
        dataFile.close();
        Serial.println("success");
      } else {
        Serial.println("Error trying to open log.csv");
      }
    }
The “success” printed to the console is to ensure that everything is working properly. If you don’t see this when simulating rain, check the wirings again.
Conclusion
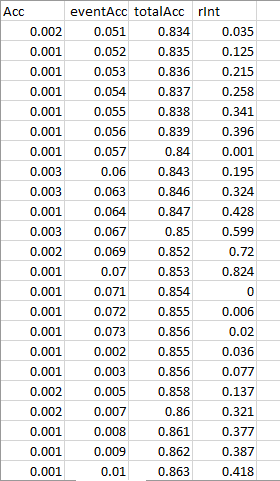
If you remove the microSD Card from the Arduino and run it on your computer, you should see one file inside with the name log.csv which then has 4 columns of data:

Full Code
#include <SPI.h>
#include <SD.h>


//ethernet shield
const int chipSelect = 10;


void setup() {
  Serial.begin(9600);
  Serial1.begin(9600);
  Serial1.write('c');
  Serial1.write('\n');

  if (!SD.begin(chipSelect)) {
    Serial.println("Card failed or not present");
  }

  Serial.println("Card Initialized.");

  if (!SD.exists("log.csv")) {
    Serial.println("Creating new file.");
    File dataFile = SD.open("log.csv", FILE_WRITE);
    dataFile.println("Acc, eventAcc, totalAcc, rInt");
    dataFile.close();
  }
}

void loop() {

  String response = Serial1.readStringUntil('\n');
  if (response.startsWith("Acc")) {
    char acc[7], eventAcc[7], totalAcc[7], rInt[7], unit[4];
    sscanf (response.c_str(), "%*s %s %[^,] , %*s %s %*s %*s %s %*s %*s %s", &acc, &unit, &eventAcc, &totalAcc, &rInt);
    if (SD.exists("log.csv")) {


    File dataFile = SD.open("log.csv", FILE_WRITE);

      if (dataFile) {
        dataFile.print(atof(acc), 3);
        dataFile.print(",");
        dataFile.print(atof(eventAcc), 3);
        dataFile.print(",");
        dataFile.print(atof(totalAcc), 3);
        dataFile.print(",");
        dataFile.println(atof(rInt), 3);
        dataFile.close();
        Serial.println("success");
      } else {
        Serial.println("Error trying to open log.csv");
      }
    }
  }
  delay(3000);
}