RG-15 Serial Output
- This tutorial shows how to read serial output from the RG. In this example the serial data forwards from the RG to the computer to show a use case for the output.
- Materials: Arduino, RG-15 or 17, mUSB cable, 4 connector wires (ground, 5v, Rx, Tx), BreadBoard
- Make sure to have Arduino IDE installed on your computer.
Installation
- Install Hydreon-Arduino library.
- In Arduino IDE go to File->Examples and find RG15Examples (near bottom).
- For this tutorial we will be using AVR-SerialOutput however a SAMD example can be found for nano 33 devices.
Build
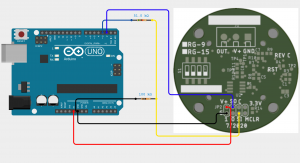
UNO
| Color | Arduino | RG-15 |
|---|---|---|
| Red | 5v | V+ |
| Black | Ground | G |
| Blue | 2 | SO |
| Yellow | 3 | SI |

Code
The RG is a serial communication device just like the Arduino; Our goal is to capture the data from the device and send the data through the computer serial stream.Arduino (Uno, mega, …AVR):
In the arduino startup() method initialize both the computer serial stream and the RG-15 stream.SoftwareSerial mySerial(2, 3); // RX, TX
void setup() {
    Serial.begin(9600);
    Serial.println("setup");
    Serial1.begin(9600);
    rg15.setStream(&Serial1);
}
RG15Arduino#poll()
void loop() {
      if(rg15.poll()) {
          Serial.print("Accumulation: ");
	        Serial.print(rg15.acc,3);
	        Serial.print(rg15.unit);
	        Serial.write(", Event Accumulation: ");
	        Serial.print(rg15.eventAcc,3);
	        Serial.print(rg15.unit);
	        Serial.write(", Total Accumulation: ");
	        Serial.print(rg15.totalAcc,3);
	        Serial.print(rg15.unit);
	        Serial.write(", IPH: ");
	        Serial.println(rg15.rInt,3);
    } else {
       Serial.println("Timeout!");
    }
    delay(

1000);
}
SAMD
The process for these boards is only slightly different. Instead of having to create a software serial registry, we can use the hardware based one instead. The code is exactly the same as the ArduinoAVR board, but instead of mySerial as RG, we use the Serial1 hardware type.void setup() {
Serial.begin(9600);
Serial.println("setup");
Serial1.begin(9600);
rg15.setStream(&Serial1);
}
Conclusion
Assuming rg15.poll() returns true, we send the computer the updated values in rg15. After Serial.print() runs, you should see an output in your serial monitor like this:
